Thursday, February 26, 2009

Creating and using GeoMedia WebMap Geocoding with the sample dataset

GeoMedia WebMap 6.1 can be used to create and provide geocoding web services. Here are the steps to create the geocoding web service.
  1. On the Windows desktop, select Start > All Programs > GeoMedia WebMap > Publisher > Server Configuration Utility.

    The Publisher Server Configuratin Utility dialog box appears.

  2. Click Add.

    The GeoMedia WebMap Publisher Application And Service Wizard appears.

  3. In the drop down list, select Location Utility Web Service.

    The GeoMedia WebMap Publisher Application And Service Wizard should like the screen below.

  4. Click Next.

    The New Location Utility Web Service Wizard appears.

  5.  If you want to use the sample data in the new web service, then toggle on Include demo data in the web service.

    The New Location Utility Web Service Wizard may look like the screen below.


  6. Click Next five times to complete the wizard. If you want to change the default Location, website and virtual directory alias name, then please do so when prompted.

    The new web service is created.

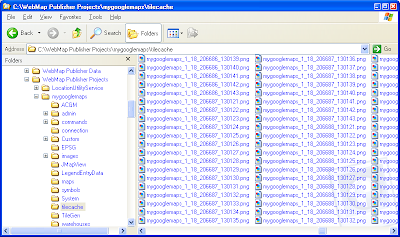
    If you choose to use the sample dataset, then the following address geocoding index files would be copied over to the default WebMap Publisher Project folder as shown below.

Once the Location Utility Web Service has been created, you can write a web page or a Windows application to connect to and perform geocoding requests to the web service. An example Windows Console program is shown below. All the program does is to submit the address string: "1818 Lake Avenue, Knoxville, 37916" to the web service and prints out the results of the geocoding matches from the web service. 


The c# code snippet for this simple example is shown below.

//Get a pointer to the geocoding web service
localhost.WSILocationUtility theWebSvc = new localhost.WSILocationUtility();
theWebSvc.Url = "http://localhost/locationutilityservice/locate.asmx";

//Get information about the address geocoding datasets. 
//There are 2 sets in the sample dataset.
localhost.LocationUtilityDatasetInfo[] dsInfo = theWebSvc.GetAllDatasetInfo();

//Form the street address to submit to the geocoding web service
localhost.StreetAddress streetAddr = new localhost.StreetAddress();
streetAddr.Street = "1818 Lake Avenue";
streetAddr.Municipality = "Knoxville";
streetAddr.PostalCode = "37916";

//Just print out some informative messages
Console.WriteLine ("Street to geocode is '" + streetAddr.Street + "'");
Console.WriteLine("Municipality to geocode is '" + streetAddr.Municipality + "'");
Console.WriteLine("Postal code to geocode is '" + streetAddr.PostalCode + "'");

//Add the street address to an array of addresses. 
//We can submit more than one address to the web service. 
localhost.Address[] addresses;
addresses = new localhost.Address[1];
addresses[0] = streetAddr;

//Set the parameters to control the geocoding matching
localhost.GeocodeSpec spec = new localhost.GeocodeSpec();
// We want to query the 2nd dataset which is TN or Tennessee";
spec.DatasetName = dsInfo[1].Name; 
spec.MaxResultCount = 5;
spec.MinimumCandidateScore = 80;
spec.ReturnMatchedAddress = true;
spec.ReturnPointGeometry = true;            

localhost.GeocodeResult[] geocodeResults;

try
{
//Submit the addresses to the geocoding web service
   geocodeResults = theWebSvc.Geocode(spec, addresses);
   Console.WriteLine("Found " + geocodeResults.Length.ToString() + " match(es).");
//If there are any matches...
   if (geocodeResults.Length > 0)
   {
      for (int i = 0; i < geocodeResults.Length; i++)
      {
         localhost.GeocodeResult result = geocodeResults[i];
         localhost.GeocodedAddress[] resultAddrs = result.GeocodedAddresses;

//For each geocoded result...
         for (int j = 0; j < resultAddrs.Length; j++)
         {
            localhost.GeocodedAddress resultAddr = resultAddrs[j];
            localhost.Address matchAddr = resultAddr.MatchedAddress;
            localhost.StreetAddress matchStAddr = (localhost.StreetAddress) matchAddr;                    
            localhost.Address standardAddr = resultAddr.StandardizedAddress;

//Get the geocoded point location
            localhost.PointPropertyType pntPropTyp = resultAddr.PointGeometry;
            string matchStats = resultAddr.MatchStatus;
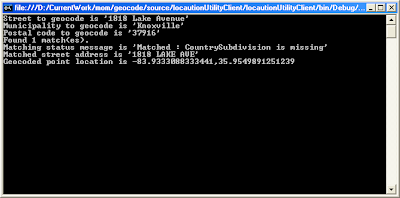
            Console.WriteLine("Matching status message is '" + matchStats + "'");
            Console.WriteLine("Matched street address is '" + matchStAddr.Street + "'");
            Console.WriteLine("Geocoded point location is " + pntPropTyp.Point.coordinates.Value);
         }
      }
   }
}
catch (Exception ex)
   {
       Console.WriteLine(ex.Message);
       Console.WriteLine(ex.StackTrace);
   }

Tuesday, February 10, 2009

Javascript code to read GeoMedia WebMap 6.1 generated tiles

In my previous post, I talk about using GeoMedia WebMap 6.1 to pre-generate map tiles in png format for use in Google Maps. After you have created all the png map tiles, it will no longer be necessary to start up the GeoMedia WebMap service to serve the png map tiles to the Internet browser clients. All you need to do is to write your own web page and Javascript code to wrap the png map tiles into a custom Google Maps tile layer.
Assuming you have created the png map tiles in the following folder C:\WebMap Publisher Projects\mygooglemaps\tilecache\ and the files are all named in the following naming convention mygooglemaps_1_(zoom)_(x)_(y).png, as shown in the figure above, we can write the following Javascript code. 


//If the tiles I have created have zoom levels ranging from 10 to 18 and the 
//geographical area ranges from 103 deg E to 104 deg E and 
//1 deg N to 2 deg N, then I can code in the constants as follows. 


var minZoom = 10;
var maxZoom = 18;
var minLng = 103;
var maxLng = 104;
var minLat = 1;
var maxLat = 2 ;

var copyright;
var copyrights;
var tileLayer;
var tileLayers;
var custommap;

//Get a pointer to the Google Maps canvas area on the web page.
//The id is "map" in this example.
map = new GMap(document.getElementById("map"));

//Display the large zoom slider control
map.addControl(new GLargeMapControl());

//Create a new copyright within the data's geographical extents
copyright = new GCopyright ( 1, 
new GLatLngBounds ( new GLatLng(minLng, minLat),new GLatLng(maxLng, maxLat)), 
minZoom, 
'Copyright 2009 dominoc');
copyrights = new GCopyrightCollection('dominoc Copyrights');
copyrights.addCopyright ( copyright);

//Create a new map tile layer that has the zoom levels of the png 
//map tiles and copyrights
tileLayers = [ new GTileLayer (copyrights, minZoom, maxZoom)];

//Define the callback function for retrieving the png map tiles
tileLayers[0].getTileUrl = function ( tile, zoom) {
var url =  "http://localhost/mygooglemaps/tilecache/mygooglemaps_1" + "_" + zoom + "_" + tile.x + "_" + tile.y + ".png";
return url;
};
tileLayers[0].isPng = function() { return true; }
tileLayers[0].getOpacity = function() { return 1.0; }
tileLayers[0].minResolution = function() { return minZoom; }
tileLayers[0].maxResolution = function() { return maxZoom; }
//Finally, create the new map type for the map tiles with
//the button named "dominoc" and display it.
//Display the message "No data available" where there are no
//tiles.
custommap = new GMapType ( tileLayers, new GMercatorProjection(maxZoom + 1), "dominoc", {errorMessage: "No data available"});
map.addMapType(custommap);
map.addControl(new GMapTypeControl());


A sample display of the result in shown in the screen shot below. 

Monday, February 2, 2009

Generate Google Maps tiles with GeoMedia WebMap 6.1

You can use GeoMedia WebMap 6.1 to create Google Maps mashups map tiles with data from GeoMedia warehouses. The WebMap Publisher commands that come out of the box allow you to quickly publish a mashup site, all through easy to use graphical wizards. Although GeoMedia WebMap can dynamically generate the map tiles as users browse the mashup, it can be really slow for users, instead of the couple of seconds wait that they are accustomed to on the public Google Maps site. To improve the performance of the mashup site, there are a couple of things you can do: (a) pre-create the map tiles before hand and (b) group the legend entries. If you don't group the legend entries, each legend entry will have its own set of map tiles; so by grouping the legend entries into a single group, only a single set of map tiles will be generated per zoom scale.

GeoMedia WebMap version 6.1 has a couple of bugs which will give you with some grief. One of them is that the Publisher graphical commands are unable to group the legend entries eventhough there is an option for it on the graphical user interface. The other is that the batch tile generation script has some syntax errors. I have gone through that frustration and will be able to share the steps to actually generate the map tiles successfully in batch and as a group. The steps can be broken down into 3 major tasks: (a) Create a blank Publisher Web Application site, (b) Publish a GeoMedia Workspace to the Web Application, and (c) Generate the map tiles in batch.

Create a blank Publisher Web Application
  1. On the Windows desktop, select Start > All Programs > GeoMedia WebMap > Publisher > Server Configuration Utility.

    The Publisher Server Configuration Utility dialog box appears.

  2. Click Add.

    The GeoMedia WebMap Publisher Application And Service Wizard appears.

  3. Click Next.

    The New Web Application and Service Wizard appears.

  4. Click Next and in the Name field type in a name, e.g. mygooglemaps


  5. Click Next in the following screens until the wizard is completed.


  6. Click Next.

    The new web site is created.
Publish a GeoMedia Workspace
  1. In GeoMedia, open up a workspace with your warehouses connected and features displayed in the map window.


  2. In the Legend, click the Groups tab.


  3. In the Legend, right click on the white space.

    A context menu appears.

  4. Select New Group. Name the group as Group1 if you like. Drag and drop the legend entries onto the group so that they appear underneath the group node, as shown below.


  5. Click the GeoMedia WebMap Publisher Administrator button.

    The Open Application dialog box appears.

  6. In the Open Application dialog box, select a Publisher Web Application, e.g. mygooglemaps.
  7. Click Open.

    The GeoMedia WebMap Publisher Administrator dockable toolbar appears.

  8. Click the Map Content button.

    The Map Content dialog box appears.

  9. Click the Themes node.


  10. Click Add Theme.


  11. In the tree field, right click on the Theme1 node.


  12. Select Add Map.


  13. Click Get from active map window.


  14. Expand the Map1 node.


  15. Click on the Legend node.


  16. Click Synchronize Legend.


  17. Expand the Legend node and click the Group1 node. Toggle on Publish this group as a single layer in mashups.

    Note: in version 6.1, this option does not work properly. Each legend entry will be pulished as a single map tile layer per zoom scale on the mashup web site eventhough the group option is on.


  18. Click OK.
  19. In the GeoMedia WebMap Publisher Administrator toolbar, click the Settings button.

    The Settings dialog box appears.

  20. Click the Map tab.


  21. In the Map format field, select PNG.
  22. In the Viewer type field, select Browser (GM Mashups).


  23. Click OK.
  24. In the GeoMedia WebMap Publisher Administrator toolbox, click Publish and Populate the GeoWorkspace button and select Publish the GeoWorkspace Contents to the Metadata.

    The contents are published to the web site.
  25. Close GeoMedia if you like.
Generate the Map Tiles in Batch
  1. In Windows Explorer, browse to the GeoMedia WebMap folder containing the batch tile generation files tilegen.bat and tilegen.vbs (in C:\Program Files\GeoMedia WebMap\Publisher\TileGen\) as shown below.


  2. Copy the TileGen folder to your mashup web site folder C:\WebMap Publisher Projects\mygooglemaps\ as shown below.


  3. Using your favorite text editor, create the file tilegen.xml and placed in the folder containing the batch tilegen files e.g. C:\WebMap Publisher Projects\mygooglemaps\TileGen\.

    Note: An example of the contents of the tilegen.xml file is as follows:


    <?xml version="1.0" encoding="utf-8" ?>
    <tilegen appname="wpgm"
    minzoom="1"
    maxzoom="4"
    xmin="-180"
    xmax="180"
    ymin="85.0511287798066"
    ymax="-85.0511287798066"
    autorange="no"
    overwrite="no">
    <le>1</le>
    <le>2</le>
    </tilegen>


    However, the ymin and ymax attributes do not work properly because of a coding error in the tilegen.vbs script. You can modify the tilegen.vbs file to correct the error if you like if you want to use the range to limit the map tiles generation.
  4. I prefer to use the following as the tilegen.xml file. Replace appname="mygooglemaps" with the name of your Publisher Web Application. You can define the min and max zoom levels of map tiles to generate (the levels range from 1 to 17, I think). I set autorange to "yes" to let GeoMedia WebMap automatically determine the range of the map tiles to generate.


    <?xml version="1.0" encoding="utf-8" ?>
    <tilegen appname="mygooglemaps"
    minzoom="1"
    maxzoom="4"
    autorange="yes"
    overwrite="no">
    </tilegen>


  5. Open up a command prompt and change the directory to the location of my tilegen files. Type in the following:

    C:\> tilegen tilegen.vbs


  6. At the end of the process, you can browse the tilecache folder to see the generated map tiles as shown below.