- Download the latest liblas source code from http://www.liblas.org/download.html. Extract the files to a folder e.g. E:\Work\src\liblas-1.7.0\.
- On the Windows Desktop, select Start | All Programs | CMake 2.8 | CMake (cmake-gui).
The CMake application appears.
- In the Where is the source code field, click Browse Source.
The Browse for Folder dialog box appears.
- Select the folder where the liblas archive was extracted, e.g. E:\Work\src\libLAS-1.7.0\. Click OK.
- In the Where to build the binaries field, click Browse Build.
The Browse for Folder dialog box appears.
- Select or create the folder where the Microsoft Visual Studio solution project files will be created e.g. E:\Work\src\libLAS-1.7.0\bin\. Click OK.

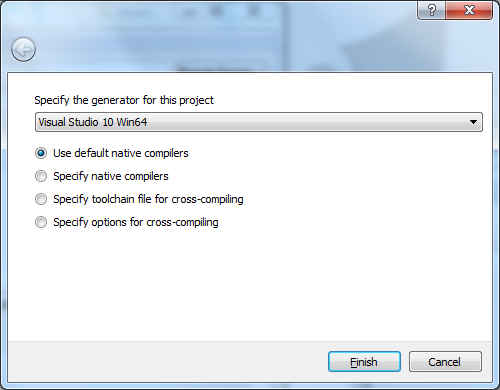
- Click Configure.
A prompt appears.
- In the combo box, choose a generator for this project e.g. Visual Studio 10 Win64. Click Finish.
A Error message appears.
- Close the message.

- In the list box, select Boost_INCLUDE_DIR. Then click the browse [...] button.
The Browse For Folder dialog box appears.
- Choose the root folder containing Boost e.g. E:\Work\src\boost_1_52_0\. Click OK.
Note: the boost folder containing the header include files should be underneath the root folder. - Click Configure again.
The configuration files are created.
- Click Generate.
The Microsoft Visual Studio project files are generated the specified destination build folder.
- Close CMake.
- Run Microsoft Visual Studio 2010. Open up the libLAS.sln file.
- Press F7 to build all the projects.
The 64 bit liblas binaries are generated.

About Geospatial Applications, Intergraph GeoMedia, FME, Visual Studio, gvSIG, Global Mapper, Programming, LiDAR, GIS, Google Maps, SAGA GIS, Android, QGIS
Monday, March 25, 2013
Build the basic liblas for 64 bit Windows (no GDAL and GeoTIFF support)
In order to build 64 bit Windows binaries of liblas, the header files and 64 bit binaries for Boost must be accessible by Microsoft Visual Studio. The CMake utility from http://www.cmake.org needs to be used to configure and generate the Microsoft Visual Studio project files for liblas. The following illustrates how I build the basic liblas 64 bit binaries (no GDAL or GeoTIFF support). Note that the 64-bit executables may not run successfully even though the compilation is successful depending on how the source code was written.


Monday, March 18, 2013
Simple Android app for converting between GPS Week/Seconds Time and local date time

Clicking on the buttons will bring up pickers for selecting the input values, as shown below.


Monday, March 11, 2013
Build 64 bit GDAL for Windows
In building libLAS from source, there is the option of linking it with GDAL. Since I was interested in making 64 bit Windows version of libLAS, I had to find or make my own 64 bit versions of GDAL. Eventually, I decided to build my own. The following are the steps I did to compile 64 bit GDAL on Microsoft Visual Studio 2010. Note that the 64 bit executables may not run successfully depending on the source code even if the compilation is successful.
- Download the latest GDAL source code from http://download.osgeo.org/gdal/. Extract the files into a folder e.g. C:\Work\src\gdal-1.9.2\.
- On the Windows Desktop, select Start | All Programs | Microsoft Visual Studio 2010 | Visual Studio Tools | Visual Studio x64 Win64 Command Prompt.
The Visual Studio x64 Win64 Command Prompt appears. - In the Command Prompt, change directory to the extracted GDAL source code root folder.
C:\> cd \Work\src\gdal-1.9.2 - Build the GDAL 64 bit Windows binaries with the nmake command.
C:\> nmake /f makefile.vc MSVC_VER=1600 WIN64=YES
The binaries are generated.
Monday, March 4, 2013
How to build 64-bit versions of libgeotiff for Windows
 I could not find 64-bit binaries of the open-source libGeotiff library so I decided to download the most recent source code from http://trac.osgeo.org/geotiff/ so that I could use Microsoft Visual Studio 2010 to compile make my own. Other libraries are also required so I downloaded the latest source code for libTiff from http://download.osgeo.org/libtiff/ and Proj4 from http://trac.osgeo.org/proj/. I have no problems compiling libTiff and Proj4 as is but I had to modify the libGeotiff's makefile.vc file to make it compile successfully. Note that successful compilation does not necessarily mean the 64 bit executables will run successfully.
Compile 64 bit version of Proj4
- Extract the Proj4 source code into a folder e.g. C:\Work\src\proj-4.8.0\
- Select Start | All Programs | Microsoft Visual Studio 2010 | Visual Studio Tools | Visual Studio x64 Win64 Command Prompt.
The Win64 Command Prompt appears.
- In the Command Prompt, type in and enter the following:
C:\> cd \Work\src\proj-4.8.0
- Run the nmake build command in the Command Prompt:
C:\> nmake /f makefile.vc
The 64 bit version of Proj4 is created.

Compile 64 bit version of libTiff
- Extract the libTiff source code into a folder e.g. C:\Work\src\tiff-4.0.3\.
- Open up the Win64 Command Prompt if it is not already on the screen.
- In the Command Prompt, type in the following command.
C:\> cd \Work\src\tiff-4.0.3\
- Run the nmake build command in the Command Prompt.
C:\> nmake /f makefile.vc
The 64 bit version of libTiff is created.
Compile 64-bit version of libGeotiff
- Extract the libGeotiff source code into a folder e.g. C:\Work\src\libgeotiff-1.4.0\.
- Use a text editor to open up the header file geo_config.h. Add in the line #define BUILD_AS_DLL 1 as shown in red below.
/* geo_config.h.  Generated from geo_config.h.in by configure.  */
#ifndef GEO_CONFIG_H
#define GEO_CONFIG_H

#define BUILD_AS_DLL 1

/* Define if you have the ANSI C header files.  */
#define STDC_HEADERS 1

/* Define if you have the <stdlib.h> header file.  */
#define HAVE_STDLIB_H 1

/* Define if you have the <string.h> header file.  */
#define HAVE_STRING_H 1

/* Define if you have the <strings.h> header file.  */
#define HAVE_STRINGS_H 1

#define HAVE_LIBPROJ 1
/* #undef HAVE_PROJECTS_H */

#endif /* ndef GEO_CONFIG_H */
- Use a text editor to open up the libGeotiff's makefile.vc file.
- Replace the contents of makefile.vc with the contents below.
Note: the parts that were modified are colored in red.
#
# Typically the only thing that needs to be changed are the paths to the
# TIFF tree.  Note that we expect an existing build tree, in part because we
# need private include files from libtiff, but also we need access to getopt.h.
# in the ports directory.
#
# You may want to add optimization options to the CFLAGS macro as well.
#

TIFF = C:\Work\src\tiff-4.0.3
PROJ4 = C:\Work\proj-4.8.0

TIFF_INC = -I$(TIFF)\libtiff
TIFF_LIB = $(TIFF)\libtiff\libtiff.lib
TIFF_LIB_DLL = $(TIFF)\libtiff\libtiff_i.lib
PROJ4_INC = -I$(PROJ4)\src
PROJ_LIB = $(PROJ4)\src\proj.lib
PROJ4_LIB_DLL = $(PROJ4)\src\proj_i.lib

# Installation locations (with install, or devinstall targets)
PREFIX =    release
BINDIR =    $(PREFIX)\bin
LIBDIR =    $(PREFIX)\lib
INCDIR =    $(PREFIX)\include
DATADIR =    $(PREFIX)\share\epsg_csv

#
CC      = cl
INCL    = -I. -Ilibxtiff $(TIFF_INC) $(PROJ4_INC)


# Pick the first LIBS definition for a static libtiff.lib or the second
# to link against the libtiff DLL.

#LIBS    = geotiff.lib $(TIFF_LIB) $(PROJ4_LIB)
LIBS    = geotiff_i.lib $(TIFF_LIB_DLL) $(PROJ4_LIB_DLL)

DLLNAME = geotiff.dll

# Set optimization or debug flags here.
CFLAGS  = $(INCL) /MD /Ox /nologo
#CFLAGS  = $(INCL) /MD /Zi /nologo

#
OBJS    = \
    xtiff.obj \
    geo_free.obj \
    geo_get.obj \
    geo_names.obj \
    geo_new.obj \
    geo_print.obj \
    geo_set.obj \
    geo_tiffp.obj \
    geo_write.obj \
    geo_extra.obj \
    geo_trans.obj \
    geo_normalize.obj \
    geotiff_proj4.obj \
    geo_simpletags.obj \
    cpl_csv.obj \
    cpl_serv.obj

all:    geo_config.h geotiff.lib $(DLLNAME) listgeo.exe geotifcp.exe

listgeo.exe:    bin\listgeo.c geotiff.lib
    $(CC) $(CFLAGS) bin\listgeo.c $(LIBS)

geotifcp.exe:    bin\geotifcp.c geotiff.lib
    $(CC) $(CFLAGS) bin\geotifcp.c bin\getopt.c $(LIBS)

gt_update.exe:    bin\gt_update.c geotiff.lib
    $(CC) $(CFLAGS) bin\gt_update.c bin\getopt.c geotiff.lib $(LIBS)

geotiff.lib:    $(OBJS)
    lib /out:geotiff.lib $(OBJS)

#
$(DLLNAME):    $(OBJS)
    link /dll /out:$(DLLNAME) /implib:geotiff_i.lib $(OBJS) $(TIFF_LIB_DLL) $(PROJ4_LIB_DLL)
    if exist $(DLLNAME).manifest mt -manifest $(DLLNAME).manifest -outputresource:$(DLLNAME);2

geo_config.h:    geo_config.h.vc
    copy geo_config.h.vc geo_config.h

xtiff.obj: libxtiff\xtiff.c
    $(CC) -c $(CFLAGS) libxtiff\xtiff.c

geo_free.obj: geo_free.c
    $(CC) -c $(CFLAGS) geo_free.c

geo_get.obj: geo_get.c
    $(CC) -c $(CFLAGS) geo_get.c

geo_names.obj: geo_names.c
    $(CC) -c $(CFLAGS) geo_names.c

geo_new.obj: geo_new.c
    $(CC) -c $(CFLAGS) geo_new.c

geo_print.obj: geo_print.c
    $(CC) -c $(CFLAGS) geo_print.c

geo_set.obj: geo_set.c
    $(CC) -c $(CFLAGS) geo_set.c

geo_tiffp.obj: geo_tiffp.c
    $(CC) -c $(CFLAGS) geo_tiffp.c

geo_write.obj: geo_write.c
    $(CC) -c $(CFLAGS) geo_write.c

geo_trans.obj: geo_trans.c
    $(CC) -c $(CFLAGS) geo_trans.c

geo_extra.obj: geo_extra.c
    $(CC) -c $(CFLAGS) geo_extra.c

geo_normalize.obj: geo_normalize.c
    $(CC) -c $(CFLAGS) geo_normalize.c

geotiff_proj4.obj: geotiff_proj4.c
    $(CC) -c $(CFLAGS) geotiff_proj4.c

cpl_csv.obj: cpl_csv.c
    $(CC) -c $(CFLAGS) cpl_csv.c

cpl_serv.obj: cpl_serv.c
    $(CC) -c $(CFLAGS) cpl_serv.c

clean:
    -del *.obj
    -del *.exe
    -del *.lib
    -del *.dll
    -del *.manifest

install:    all
    -mkdir $(PREFIX)
    -mkdir $(BINDIR)
    -mkdir $(DATADIR)
    copy *.dll $(BINDIR)
    copy *.exe $(BINDIR)
    -copy csv\*.csv $(DATADIR)

devinstall:    install
    -mkdir $(INCDIR)
    -mkdir $(LIBDIR)
    copy *.lib $(LIBDIR)
    copy *.h $(INCDIR)
    copy libxtiff\*.h $(INCDIR)
    copy *.inc $(INCDIR)
- Save and close the text editor.
- Open up the Win64 Command Prompt if it is not on the screen.
- In the Command Prompt, type in the following.
C:\> cd \Work\src\libgeotiff-1.4.0\
- Run the nmake build command in the Command Prompt.
C:\> nmake /f makefile.vc
The 64 bit libgeotiff files are created.
Subscribe to:
Posts (Atom)
