Monday, February 24, 2014

Create an Android PreferenceScreen using Java, not with XML

The Android preference fragment/activity is usually used to show a list of shared preferences for users to interact with. The list of the preferences is typically predefined using an XML file. But I wanted to define the list of preferences at run time because I had a variable list of preferences, which are known only at run time. This can be done by overriding the PreferenceFragment's or PreferenceActivity's onCreate method and manually creating and appending your own preferences to the root of the PreferenceScreen object.

The following code snippet for a PreferenceFragment shows how this is done. Make the appropriate changes for pre-Honeycomb Android versions.

//...etc...
public class MyPreferenceFragment extends PreferenceFragment {
 
@Override
public void onCreate(Bundle savedInstanceState) {
super.onCreate(savedInstanceState);

//create my own PreferenceScreen
setPreferenceScreen(createMyPreference());
}
private PreferenceScreen createMyPrefenceScreen(){
//just an array of title strings for the preferences
String[] titles = { "Title1", "Title2", "Title3"};

//just an array of summary text strings for the preferences
String[] summaries = { "Summary1", "Summary2", "Summary3"};

PreferenceScreen root = getPreferenceManager().createPreferenceScreen(getActivity());
 
for (int i=0; i<titles.length; i++){
//create a preference
Preference pref = new Preference(getActivity());

//set the preference's title and summary text
pref.setTitle( titles[i]);
pref.setSummary( summaries[i]);
pref.setSelectable(false);

//append the preference to the PreferenceScreen
root.addPreference(pref);
}
 
return root;
}
}

The following screenshot shows how the resultant preference fragment/activity looks like.

Monday, February 17, 2014

How to upload, update and save an image file to Google Drive using Javascript

This is a simple Javascript Google Drive example web app to load an image file from a local drive, write some text on the image, then save the edited image to Google Drive in the cloud. The basis of this example came from the Google Drive SDK Javascript Quickstart at this location https://developers.google.com/drive/quickstart-js. Read up the Google Drive SDK Javascript Quickstart to see how to enable the Google Drive API and setup a Google Drive Javascript web app.

Setup the Javascript app
Copy the following source code and save into your own html file. Change the string <YOUR_CLIENT_ID> to your own client ID assigned to you when you created your cloud project in http://cloud.google.com/console. Publish the page to a web server.

In general, this is what the Javascript code is doing: (1) load and draw the local image file in the canvas element, (2) draw the string "Hello World" onto the canvas, (3) save the canvas into an IMG element, (4) upload the IMG element source data into Google Drive.

<html>
<head>
<meta http-equiv="Content-type" content="text/html;charset=UTF-8">
<script type="text/javascript">
 
var CLIENT_ID = '<YOUR_CLIENT_ID>';
var SCOPES = 'https://www.googleapis.com/auth/drive';
 
/**
       * Called when the client library is loaded to start the auth flow.
       */
function handleClientLoad() {
window.setTimeout(checkAuth, 1);
}
 
/**
       * Check if the current user has authorized the application.
       */
function checkAuth() {
gapi.auth.authorize(
{'client_id': CLIENT_ID, 'scope': SCOPES, 'immediate': true},
handleAuthResult);
}
 
/**
       * Called when authorization server replies.
       *
       * @param {Object} authResult Authorization result.
       */
function handleAuthResult(authResult) {
var authButton = document.getElementById('authorizeButton');
var filePicker = document.getElementById('filePicker');
var uploadButton = document.getElementById('uploadButton');

authButton.style.display = 'none';
filePicker.style.display = 'none';
uploadButton.style.display = 'none';
if (authResult && !authResult.error) {
// Access token has been successfully retrieved, requests can be sent to the API.
filePicker.style.display = 'block';
filePicker.onchange = loadImageFile;
uploadButton.onclick = newUploadFile;
} else {
// No access token could be retrieved, show the button to start the authorization flow.
authButton.style.display = 'block';
authButton.onclick = function() {
gapi.auth.authorize(
{'client_id': CLIENT_ID, 'scope': SCOPES, 'immediate': false},
handleAuthResult);
};
}
}
 
function newUploadFile(evt){
gapi.client.load('drive','v2', function(){
var theImage = document.getElementById('editedImage');
var fileTitle = theImage.getAttribute('fileName');
var mimeType = theImage.getAttribute('mimeType');
var metadata = {
'title': fileTitle,
'mimeType': mimeType
};
var pattern = 'data:' + mimeType + ';base64,';
var base64Data = theImage.src.replace(pattern,'');            
newInsertFile(base64Data,metadata);
});
}
/**
       * Insert new file.
       *
       * @param {Image} Base 64 image data
       * @param {Metadata} Image metadata
       * @param {Function} callback Function to call when the request is complete.
       */
function newInsertFile(base64Data, metadata, callback){
const boundary = '-------314159265358979323846';
const delimiter = "\r\n--" + boundary + "\r\n";
const close_delim = "\r\n--" + boundary + "--";
var contentType = metadata.mimeType || 'application/octet-stream';
var multipartRequestBody =
delimiter +
'Content-Type: application/json\r\n\r\n' +
JSON.stringify(metadata) +
delimiter +
'Content-Type: ' + contentType + '\r\n' +
'Content-Transfer-Encoding: base64\r\n' +
'\r\n' +
base64Data +
close_delim;
 
var request = gapi.client.request({
'path' : '/upload/drive/v2/files',
'method' : 'POST',
'params' : {
'uploadType' : 'multipart'
},
'headers' : {
'Content-Type' : 'multipart/mixed; boundary="' + boundary + '"'
},
'body' : multipartRequestBody
});
if (!callback) {
callback = function (file) {
alert('done');
};
}
request.execute(callback);
}
function loadImageFile(evt){
var file = evt.target.files[0];
var reader = new FileReader();
reader.file = file;
reader.onload = onImageReaderLoad;
reader.readAsDataURL(file);            
}
function onImageReaderLoad(evt){
var file = this.file;
var mimeType = file.type;
writeSomeText(file.name,file.type,evt.target.result);        
}
/**
       * Write some Hello World text on an image using the canvas.
       *
       * @param {File Name} The name of the image file
       * @param {MimeType} The mime type of the image e.g. image/png
       * @param {Image} The image data
       */
function writeSomeText(sourceImageName, mimeType, sourceImage){
var resultsDiv = document.getElementById('resultsDiv');
var sourceImg = document.createElement('img');
var resultImg = document.createElement('img');
var canvas = document.createElement('canvas');
sourceImg.onload = function(evt){
canvas.width = this.width;
canvas.height = this.height;
var ctx = canvas.getContext('2d');
ctx.drawImage(this,0,0,canvas.width,canvas.height);
ctx.font = '24px Arial';
ctx.fillText('Hello World',this.width/2,this.height/2);
ctx.restore();
resultImg.onload = function(evt2){
resultImg.setAttribute('id','editedImage');
resultImg.setAttribute('mimeType', mimeType);
resultImg.setAttribute('fileName', sourceImageName);
resultsDiv.appendChild(resultImg);
var uploadButton = document.getElementById('uploadButton');
uploadButton.style.display = 'block';
};
resultImg.src = canvas.toDataURL(mimeType);
};
sourceImg.src = sourceImage;
}    
 
</script>
<script type="text/javascript" src="https://apis.google.com/js/client.js?onload=handleClientLoad"></script>
</head>
<body>
<!--Add a file picker for the user to choose an image file to be edited -->
<input type="file" id="filePicker" style="display: none" />
<!-- Add a button to start the upload process for loading the edited image file to Google Drive -->
<input type="button" id="uploadButton" style="display:none" value="Upload" />
<input type="button" id="authorizeButton" style="display: none" value="Authorize" />
<!-- div placeholder for displaying the edited image -->
<div id="resultsDiv">
</div>
</body>
</html>


Run the Javascript app

  1. Load the web page in an Internet browser.

    If the Javascript app has not been authorized by you, then the Authorize button will be displayed.
  2. Click Authorize.

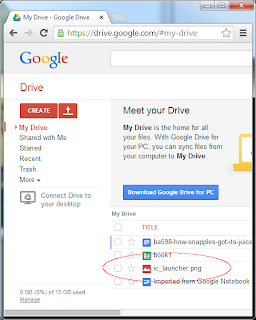
    If you are not signed in to your Google account, the following page may display. Just type in your password and sign in.


    The Request for permission page appears.
  3. Click Accept.

    The app is authorized and the browser runs the Javascript app.
  4. Click Choose File.

    The Open dialog box appears.
  5. Browse and select an image file, e.g. ic_launcher.png. Click Open.

    The app writes the text string 'Hello World' in the middle of the selected image. The Upload button appears.

  6. Click the Upload button.

    A done message appears.

     The image is saved into your Google Drive in the cloud.
 

Monday, February 10, 2014

Trainsity Vancouver Android App

Find your way around metropolitan Vancouver's SkyTrain network using the high resolution vector maps of the Canada, Expo, and Millennium lines. The maps have small file size footprints but with many levels of zoom. They can be viewed offline without any Internet connection. Users can click the train station labels to open the Google Maps or Street View apps, where they can use all the functions of the apps to visualize the surrounding area including querying for directions. The app has its own directions function for finding the best path from one train station to another.

On a mobile handset, the app will display a list of train maps, which when tapped will open up a detail view of the metro transit map, as shown below.

Tapping the station boxes will bring up an option menu where users can choose to display the station in Google Maps or Street View. There is also an option to find the best direction to or from the tapped station.

The following is an example screenshot of the best directions from the Bridgeport station to the Gateway station.

The best directions result can be exported out using the Android OS' useful Share As function.

The app is also optimized for tablet sized devices. Both the list and the vector map are displayed at the same time, as shown below.

The user can toggle the map to full screen mode by tapping the action bar icon at the top right corner.

The app can be downloaded from the Google Play Store. Just click the button below.
Get it on Google Play

Monday, February 3, 2014

How to display a preview of CSS fonts in a Select Option drop down menu

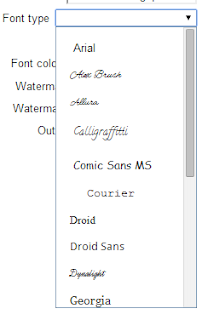
The HTML Select Option element is normally used to display a list of options for users to make a choice. I wanted to use the option list for users to choose a font to use for further processing. I thought it would be nice to be able to show a preview of the fonts in the list itself, like how word processing software like Microsoft Word does it. I managed to figure how to do it by using some web fonts from Google, cascading style sheets (CSS) and a Web Font Loader.

In general, the following needs to be done in the HTML page: (1) download the web fonts you want to use in the select option list, (2) define style sheet classes for each font,  and (3) wrap each option with the optgroup tag and assign it with the style sheet class.

I managed to get this to work for Chrome and FireFox browsers but not for any of Microsoft's Internet Explorer browsers.

Download web fonts
In the header head tag section of the HTML file, make a link using the link tag to the web fonts you want to use. An example is shown below. Here, I am linking to the Allura and Dynalight fonts from Google.


<!DOCTYPE html> 
<html> 
<head> 
<title>Example font preview</title> 
<meta name="viewport"
content="width=device-width, initial-scale=1.0, user-scalable=no"> 
<meta charset="UTF-8"> 
<link href="../webappstyles.css" rel="stylesheet" type="text/css" />
<link href='http://fonts.googleapis.com/css?family=Allura' rel='stylesheet' type='text/css'>
<link href='http://fonts.googleapis.com/css?family=Dynalight' rel='stylesheet' type='text/css'>        


If you want to use the fonts in Javascript, then it would be wise to use the Web Font Loader to pre-load the fonts. This can be done by appending the font family names to the Web Font load method. The example code shows how this is done. The code can be included in the HTML head tag section.


<script src="//ajax.googleapis.com/ajax/libs/webfont/1.4.7/webfont.js"></script>
<script>
WebFont.load({
google: {
families: ['Allura', 'Dynalight']
}
});
</script>    


Define CSS classes
Inside the style tag section of the header, define a style sheet class for each font you want to use.


<style type="text/css">
.Allura { font-family: Allura, cursive; }
.Dynalight { font-family: Dynalight, cursive; }    
</style>

Wrap each option
In the select tag, wrap each option tag with the optgroup tag and assign the appropriate CSS style defined previously.


<select id="fontTypeCombo">
<optgroup class='Allura'>
<option>Allura</option>
</optgroup>
<optgroup class='Dynalight'>
<option>Dynalight</option>
</optgroup>
</select>

Now, when the HTML page is displayed in Chrome or FireFox, clicking on the select option combo box should display a list with a preview of the fonts.