- To determine the camera matrix and distortion coefficient matrix, run Agisoft Lens.
- Select Tools | Show Chessboard.
A chessboard pattern is displayed on the screen. - Use the camera you want to calibrate and take a few photos of the chessboard pattern at different angles. Then copy the images to the computer.
- In Agisoft Lens, select Tools | Add Photos.
The Add Photos dialog box appears. - Browse and select the chessboard images captured previously. Click Open.
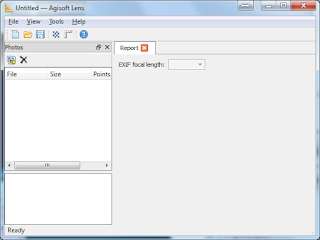
The images are listed in Agisoft Lens.
- Select Tools | Calibrate.
The Calibration dialog box appears.
- Toggle on the camera and distortion coefficient parameters you want to calculate. Click OK.
Processing messages appear.
The matrices are calculated and displayed.
- Note down or save the parameters fx, fy, cx, cy, k1, k2, k3, p1, p2.
Note: the focal length units are in pixels.

About Geospatial Applications, Intergraph GeoMedia, FME, Visual Studio, gvSIG, Global Mapper, Programming, LiDAR, GIS, Google Maps, SAGA GIS, Android, QGIS
Monday, March 28, 2016
Using Agisoft Lens for calculating camera calibration and distortion coefficient matrices
OpenCV was giving me a hard time in calculating camera and optical distortion coefficient matrices from photo frame images of checker board pattern grids. So I tried alternative methods and I found the free Agisoft Lens (bundled with PhotoScan Professional and Standard versions) to be robust and easy to use.


Monday, March 21, 2016
Setup and Deployment (Installer) project for Visual Studio Community 2015
For a long time, Microsoft took out the Setup and Deployment project template from the free Visual Studio Express and Community editions. While you could code and develop Visual Studio projects, it was not possible to create an installer directly from within Visual Studio itself. You would have to use 3rd party solutions like Nullsoft's NSIS. So I was pleasantly surprised when I found an official Microsoft Visual Studio 2015 Installer extension that can be downloaded and installed to create installers from within Visual Studio Community.
The extension can be obtained by the following steps:

The extension can be obtained by the following steps:
- In Visual Studio Community 2015, select Tools | Extensions and Updates.
The Extensions and Updates dialog box appears.
- In the left pane, select Online. Then in the Search text box, type in a search string e.g. Visual Studio Installer. Press RETURN.
A list of extensions is displayed. - Select the extension Microsoft Visual Studio 2015 Installer Project. Click Download.
The file VSI_Bundle.exe is downloaded. - Run the downloaded VSI_Bundle.exe file.
The extension is installed.

From now on, a new Visual Studio Installer project can be created within Visual Studio 2015 Community, as shown below.

Monday, March 14, 2016
Trainsity Sapporo App for Windows Phone
The maps have small file size footprints but with many levels of zoom and can work offline without connecting to the Internet. You can zoom closer without having the details becoming blurred or "pixelated", like bitmap images. Users can click the train station labels to open Bing Maps, where they can use all the functions of the Google app to visualize the surrounding area and/or perform routing for directions. There is also an offline function to calculate the best way to travel from a station to another station with a direction breakdown and estimated timings (which may vary from the actual travelling time).
The following screenshots show how the app looks like on a Windows Phone 8+ handset.

When a tile is tapped, a detail map view of the selected line will appear, as shown below.


tapping a labeled box on the map will display the train station on the external Maps application, as shown below.

If you want to find how long it takes to travel from one station to another station, and the best route to take, simply swipe to the Route page. Then type in the From station and To station. As you enter the values, a drop down list will appear and a station can be selected from the list. Finally tap the Execute icon.

Tapping the more details link will display the recommended route to take.

Click the button below to download the app from the Windows store.

Monday, March 7, 2016
Highlight the active link on a single HTML page using jQuery and Bootstrap
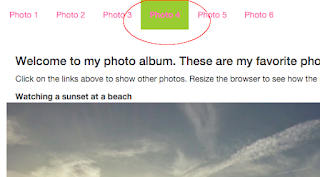
In a web page, it is useful to indicate the active page (or photo or whatever) in the navigation links by changing some style to differentiate it from the other links. An example is the Photo 4 link in the screenshot below.
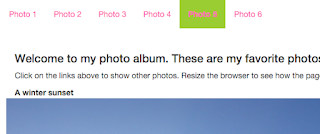
When the user clicks on another item, the other link e.g. Photo 5 is highlighted and the previously active link becomes a normal link again, as shown below.
I wanted to do the same but on a single page without resorting to server side programming. This can be done with some help using jQuery, Bootstrap, HTML and some custom CSS styles. Bootstrap can be downloaded from http://getbootstrap.com/. jQuery can be downloaded from https://jquery.com/
1. In the HTML page, set up the links with the nav semantic tag with the Bootstrap classes navbar, navbar-nav as shown below. A unique id e.g. main-nav should be assigned also.
2. Next define custom CSS styles for the non-active and active links. In this example, the non-active link is the photo-link class style.
3. To tie the HTML and the styles, create a Javascript function as shown in the code snippet below with jQuery to search for the navigation link elements with the id (main-nav) assigned previously and add a click event handler to each link. When the user clicks on a link, the function will get the active link element and remove the active class style from it. Then add the active class style to the clicked link.

When the user clicks on another item, the other link e.g. Photo 5 is highlighted and the previously active link becomes a normal link again, as shown below.

I wanted to do the same but on a single page without resorting to server side programming. This can be done with some help using jQuery, Bootstrap, HTML and some custom CSS styles. Bootstrap can be downloaded from http://getbootstrap.com/. jQuery can be downloaded from https://jquery.com/
1. In the HTML page, set up the links with the nav semantic tag with the Bootstrap classes navbar, navbar-nav as shown below. A unique id e.g. main-nav should be assigned also.
<!doctype html>
<html lang="en">
<head>
<title>My favorite photos</title>
<link href="css/bootstrap.css" rel="stylesheet"/>
<link href="css/styles.css" rel="stylesheet"/>
<script src="js/jquery.min.js" ></script>
<script src="js/bootstrap.min.js" ></script>
</head>

<body>
<nav class="navbar">
    <div>
        <ul id="main-nav" class="nav navbar-nav">
            <li><a href="#" class="active photo-link" >Photo 1</a></li>
            <li><a href="#" class="photo-link" >Photo 2</a></li>
            <li><a href="#" class="photo-link" >Photo 3</a></li>
            <li><a href="#" class="photo-link" >Photo 4</a></li>
            <li><a href="#" class="photo-link" >Photo 5</a></li>
            <li><a href="#" class="photo-link" >Photo 6</a></li>
        </ul>
    </div>
</nav>
<!-- etc -->
2. Next define custom CSS styles for the non-active and active links. In this example, the non-active link is the photo-link class style.
.photo-link{
    color: hotpink;
}
.active {
    background-color: yellowgreen;
    font-weight: bold;
}
$('#main-nav li a').on('click', function() {
    var activeLink = $('.active');
    activeLink.removeClass('active');
    $(this).parent().addClass('active');
});
Subscribe to:
Posts (Atom)
